morph::Visual – the scene class
#include <morph/Visual.h>
Table of contents
- Overview
- Instantiating
morph::Visual - Adding labels to the window
- Adding and removing
VisualModels - Setting
Visualfeatures - Working with Visuals in a loop
- Saving an image to make a movie
- Saving the scene in glTF format
- Extending morph::Visual to add custom key actions
- Underlying classes
- Working with multiple windows
- Multi-threading
- OpenGL context, version and
OWNED_MODE
Overview
morph::Visual<> manages the graphical scene in which all your morphologica visualizations will exist. morph::Visual provides a number of ‘built-in’ features for your morphologica based program, such as the ability to show a set of coordinate axes, save a PNG image or save the scene in glTF format. morph::Visual supports perspective and orthographic projections and even has an experimental cylindrical projection mode.
It is a templated class with a single template argument to specify the OpenGL version.
template <int glver = morph::gl::version_4_1>
class Visual
{ ... }
 A morph::Visual scene containing some grid-based VisualModels
You need at least one morph::Visual in your program. In general, one morph::Visual will relate to one window. (If you have two or more Visuals, then you will have two or more windows.)
The following code (adapted from the graph1.cpp example) illustrates basic usage:
// First, instantiate a 1024x768 morph::Visual object/window
morph::Visual v(1024, 768, "Window title here");

// You then create some kind of morph::VisualModel (GraphVisual derives from VisualModel):
auto gv = std::make_unique<morph::GraphVisual<double>> (morph::vec<float>({0,0,0}));
v.bindmodel (gv);                                       // bindmodel is boilerplate
morph::vvec<double> x = {0,.1,.2,.3,.4,.5,.6,.7,.8,.9}; // x axis data
gv->setdata (x, x.pow(3));                              // Graph y = x^3
gv->finalize();                                         // 'completes' the VisualModel

// By adding the VisualModel it will appear in the scene
v.addVisualModel (gv);

// You can now render manually with v.render() or until the user quits with this function:
v.keepOpen();
Instantiating morph::Visual
Instantiate your morph::Visual with the following three-argument constructor:
morph::Visual v(1280, 1024, "Your window title goes here");
The first two arguments are the width and height of the window in pixels. The third argument is the text title for the window.
Here, we omitted the template argument, allowing it to take its default value. We can also indicate clearly that the default template argument is chosen…
morph::Visual<> v(1280, 1024, "Your window title goes here");
…or explicitly select the default value:
morph::Visual<morph::gl::version_4_1> v(1280, 1024, "Your window title goes here");
The int template argument specifies the OpenGL version to request. The examples show that it can be left out. It defaults to morph::gl::version_4_1, which is compatible across Linux, Mac and Windows platforms. You can select an alternative from the values in morph/gl/version.h. You might do so to support a device such as a Raspberry Pi or to support OpenGL compute shaders.
For example, to use the latest OpenGL version, which is 4.6, you would:
morph::Visual<morph::gl::version_4_6> v(1280, 1024, "Using OpenGL 4.6");
Note that you will have to add the same version to any VisualModel instances that you create (VisualModel also has a ‘GL version’ template argument). Some more information on OpenGL versions is given below.
In addition to the usual, three-argument constructor, there’s a constructor which allows you to set parameters for the coordinate arrows (length, thickness, etc). Use this only if you need to adapt the coordinate arrows (see Visual.h for the declaration).
There is also a default, no-argument constructor, but you’ll only need to call this if you’re adapting a new OWNED_MODE.
Adding labels to the window
You can add a scene-wide label to your morph::Visual scene. Although there are a number of overloads of Visual::addLabel, the best one to use is:
//! An addLabel overload that takes a morph::TextFeatures object
morph::TextGeometry addLabel (const std::string& _text,
                              const morph::vec<float, 3>& _toffset,
                              const morph::TextFeatures& tfeatures)
This takes the text you want to show as its first argument, a positional offset within the scene for the text and an object which specifies the font, fontsize and colour for the text. TextFeatures is easy to use; its simplest constructor takes just a font size, leaving the rest of the text features to their defaults, so that an addLabel call might look like this:
morph::Visual v(1280, 1024, "Your window title goes here");
morph::vec<float> textpos = { 0, 0, 0 };
v.addLabel ("Test label", textpos, morph::TextFeatures(0.15f));
The Visual::addLabel function is similar to VisualModel::addLabel. Other ways to set the font colour and face are documented on TextFeatures and VisualModel.
Adding and removing VisualModels
Other than labels, the main constituents of your scenes will be morph::VisualModel objects. Each VisualModel contains a set of OpenGL vertex buffer objects that define an ‘OpenGL model’ comprised mostly of triangles and also of a few textures (for text). VisualModel is designed as a base class; you won’t actually add VisualModels to the morph::Visual. Instead, you’ll add objects of derived classes such as morph::GraphVisual, morph::ScatterVisual or morph::GridVisual.
Memory management of VisualModels
morph::Visual takes ownership of the memory associated with each VisualModel. It keeps an std::vector of std::unique_ptr objects to VisualModels in the member attribute Visual::vm. Here’s the relevant excerpt from Visual.h:
 protected:
    //! A vector of pointers to all the morph::VisualModels (HexGridVisual,
    //! ScatterVisual, etc) which are going to be rendered in the scene.
    std::vector<std::unique_ptr<morph::VisualModel<glver>>> vm;
This means that you don’t need to worry about deallocating your VisualModels. You simply create them (with std::make_unique<>) and add them to the Visual scene. Once your Visual owns each unique_ptr, it is responsible for deallocing the memory.
When Visual needs to render(), it will iterate through the vector vm, calling VisualModel::render() for each model.
Adding a VisualModel
To guarantee the ownership of the model will reside in the morph::Visual instance, you have to ‘pass in’ each VisualModel. The workflow is (using GraphVisual as the example and assuming the Visual object is called v):
// Create a GraphVisual. gv will be of type std::unique_ptr<morph::GraphVisual<double>>
auto gv = std::make_unique<morph::GraphVisual<double>> (morph::vec<float>({0,0,0}));
// Bind the new model to the Visual instance
v.bindmodel (gv);
// Do some GraphVisual-specific setup:
gv->setdata (x, x.pow(3));
// Call VisualModel::finalize(), which populates the OpenGL vertex/index buffers
gv->finalize();

// Now the GraphVisual has been created, add it:
morph::GraphVisual<double>* gv_pointer = v.addVisualModel (gv);
Here we’ve created a GraphVisual, set it up and added it to the scene.
The call v.bindmodel (gv) is necessary to set some callbacks in the GraphVisual. Essentially it sets the Visual object v as the ‘parent’ for the GraphVisual and sets callbacks that give the GraphVisual access to the OpenGL shader programs. You’ll write a line like this as boilerplate for every VisualModel that you create and add.
After any specific setup (here it was gv->setdata (x, x.pow(3))), you then call VisualModel::finalize(). This actually builds the model out of triangles and populates the OpenGL buffers. If you don’t call finalize(), the model won’t render at all.
Once it has been finalized, you call addVisualModel(), passing in the GraphVisual unique_ptr. This uses std::move to transfer ownership of the unique_ptr to the Visual, adding it to Visual::vm. addVisualModel returns a plain, non-owning pointer to the VisualModel, which you can use to interact with the model for the rest of the program (you’ll need to do this if you want to update the content of the graph, grid or plot). In the example I wrote the type of gv_pointer explicitly, but often I code this with auto:
auto gv_pointer = v.addVisualModel (gv);
Don’t try to use the unique_ptr object gv after you have added it to the scene! Your local unique_ptr gv no longer owns the memory.
However, you can re-use gv if you want to, setting it with another call to std::make_unique for a new model.
Using the VisualModel* pointer
The returned pointer allows you to make changes to the VisualModel during your program’s runtime. An example can be found in graph_dynamic_sine.cpp. In this snippet, x is a vvec of double precision floats, and the pointer, gvp is used to call the update method of a GraphVisual to change the sinusoid that is being displayed.
// ...code leading up to adding a GraphVisual gv to the Visual v:
auto gv_pointer = v.addVisualModel (gv);

while (v.readyToFinish == false) {
    dx += 0.01;
    v.waitevents (0.01667); // 16.67 ms ~ 60 Hz
    gv_pointer->update (x, (x+dx).sin(), 0); // <-- Update via the non-owning pointer
    v.render();
}
Removing a VisualModel from the scene
If you need to remove a model from the scene so that it no longer exists in the program, you can do so with Visual::removeVisualModel. You pass in the pointer as an identifier for the model.
// ...
auto gv_pointer = v.addVisualModel (gv);

int counter = 0;
// Render the VisualModel gv until counter exceeds 1000000:
while (v.readyToFinish == false) {
    v.render();
    v.waitevents (0.017);
    if (++counter > 1000000) {
        v.removeVisualModel (gv_pointer); // Model will vanish on next v.render()
        gv_pointer = nullptr; // you could reassign a value later with addVisualModel
    }
}
The VisualModel that was pointed to by gv_pointer is deconstructed as a result of removeVisualModel and will no longer exist in your program. Its unique_ptr is removed from the vector Visual::vm, goes out of scope and arranges the deallocation of the VisualModel.
Pointer safety
The non-owning pointer (gv_pointer in the examples) returned by addVisualModel() will be valid until:
- either the owning
morph::Visualis deconstructed - or you remove the associated VisualModel with
Visual::removeVisualModel()
Don’t mess with the memory
Do not de-allocate the memory pointed to by gv_pointer yourself! Remember that unique_ptr objects should manage the memory of each VisualModel in your program. You use the non-owning pointer only to access functions from your VisualModel or as an identifier when you want to remove your VisualModel from the scene.
Testing that a VisualModel for your pointer exists
As well as heeding the warning not to free or deallocate the pointer, you should take care that the pointer is valid for use when you dereference it to make a function call. If you are keeping track of a lot of pointers to Visual-owned VisualModels, you might need to test a pointer before dereferencing it. To do this you can use validVisualModel(gv_pointer), which returns a copy of gv_pointer if it is associated with an existing model in your morph::Visual. If there is no existing VisualModel the function returns nullptr.
Here is an update to the previous example, with a pointer check:
while (v.readyToFinish == false) {
    dx += 0.01;
    v.waitevents (0.01667); // 16.67 ms ~ 60 Hz
    if (v.validVisualModel(gv_pointer) != nullptr) {
        gv_pointer->update (x, (x+dx).sin(), 0); // safe dereference of gv_pointer
    } else { /* Don't use gv_pointer */ }
    v.render();
}
Setting Visual features
There’s a selection of features that you can enable once you’ve instanciated your Visual:
Scene translation and rotation
Once you’ve added several models to your scene, you may need to adjust where they appear in the window. Rather than moving each model programmatically (by altering offsets) you can simply shift the camera view point for the scene with a call to setSceneTrans():
v.setSceneTrans (morph::vec<float,3>{-0.35105f, -0.352273f, -2.4f});
The scene can also be rotated with
v.setSceneRotation (morph::Quaternion<float>{ 0.5f, 0.5f, -0.5f, -0.5f });
You can find the best values to provide to these functions by running your program, moving around with mouse commands until the position of your models is correct within the window and then press Ctrl-z and see stdout:
[seb@GPU3090 16:59:08 build]$ ./examples/graph1
This is version 3.0 of morph::Visual<glver=4.1> running on OpenGL Version 4.1.0 NVIDIA 535.171.04
Scenetrans setup code:
    v.setSceneTrans (morph::vec<float,3>{ float{-5.38615}, float{-0.163962}, float{-15.3} });
    v.setSceneRotation (morph::Quaternion<float>{ float{1}, float{0}, float{0}, float{0} });
Writing scene trans/rotation into /tmp/Visual.json... Success.
The lines of code you need are printed out. Convenient!
Background colour
v.backgroundWhite(); // Sets a white background (the default)
v.backgroundBlack(); // Set a black background
// or set Visual::bgcolour directly:
v.bgcolour = std::array<float, 4>({ 1.0f, 0.0f, 1.0f, 1.0f }); // RGB triplet plus alpha. Range 0-1
Lighting effects
The default shader will not apply any lighting to the scene. This means that plots that use colour to indicate values aren’t distorted by lighting variance. However, sometimes it is useful to get the sense of depth that some simple diffuse lighting provides. To turn it on it’s:
v.lightingEffects (true); // or false to explicitly turn off. Default arg is true.
You can set light_colour, intensity and the position of the diffuse light:
v.light_colour = { 1, 1, 1 };               // Element ranges 0-1
v.ambient_intensity = 0.8f;                 // Range 0-1
v.diffuse_position = { 5.0f, 5.0f, 15.0f }; // coordinates
v.diffuse_intensity = 0.4f;
Perspective/Orthographic
morph::Visual renders a 3D scene to a 2D image that gives you, the viewer, the impression that you’re viewing 3D objects. There is more than one way to project a 3D model onto a 2D image and Visual implements a couple of the major ones. These are the frustrum perspective projection and an orthographic projection. The perspective projection is the default. In any morph::Visual window, you can cycle between different projections by pressing Ctrl-y. This will cycle between perspective, orthographic and an experimental cylindrical projection.
You can select any of these as the default with the following function calls:
morph::Visual<> v(1024, 768, "Projections");
v.ptype = morph::perspective_type::orthographic;
// or
v.ptype = morph::perspective_type::perspective;
// or
v.ptype = morph::perspective_type::cylindrical;
Clipping distances and field of view
The parameters of the projections (zNear, zFar, fov, ortho_lb and ortho_tr) can be changed programatically, and they are also changed with user input, especially the mouse-wheel.
zNear and zFar are used by both perspective and orthographic projections (zNear can be changed with keys Ctrl-u/Ctrl-i). fov is used in the perspective projection (change it with the keys Ctrl-o/Ctrl-p). ortho_lb is the orthographic view’s ‘Left-bottom’ screen coordinate and ortho_rt is the right-top coordinate.
Coordinate arrows
Every morph::Visual contains a special VisualModel that shows a set of 3D coordinate arrows. You can toggle them on and off with the key Ctrl-c. By default, they’re hidden, but you can change this when you create your Visual:
morph::Visual v (1024, 768, "Coordinate arrows");
v.showCoordArrows = true;
The coordinate arrows appear in the bottom left of the screen, staying in that position, but rotating as you rotate the scene view. You can control the screen position at which the arrows appear by using additional arguments to the Visual constructor:
// Screen coordinates for the coordinate arrows. These run from -1 to +1
morph::vec<float, 2> coordinate_offset = { -0.8f, -0.8f };
// Lengths of each arm of the coordinate arrows
morph::vec<float, 3> coordinate_lengths = { 0.05f, 0.05f, 0.05f };
// How thick should the arms be?
float coordinate_thickness = 1.0f;
// A font size for the coordinate arrow labels
float coordinate_fontsize = 0.02f;

// Now construct:
morph::Visual v (1024, 768, "Coordinate arrows",
                 coordinate_offset, coordinate_lengths,
                 coordinate_thickness, coordinate_fontsize);

v.showCoordArrows = true;
If you prefer the coordinate arrows to appear within the scene, rather than fixed in the corner of the window, you can set this flag:
v.showCoordArrows = true;
v.coordArrowsInScene = true;
You can change the coordinate arrow labels from ‘x’, ‘y’ and ‘z’, if you derive a custom morph::Visual. There’s an example program that demonstrates this: unicode_coordaxes.cpp
Working with Visuals in a loop
If you have a static scene, you can simply call Visual::keepOpen(), which allows the user to rotate the view and observe the scene until quitting the program.
If you have a dynamic scene, where the scene is updated as a model is computed, or on the basis of some sort of input data, you’ll need to under stand the render, poll, wait and waitevents function calls and also how to access the VisualModels in your scene, so they can be updated.
A good example program is graph4.cpp.
In this program, we set up a Visual then add a GraphVisual:
auto gv = std::make_unique<morph::GraphVisual<float>> (morph::vec<float>({0,0,0}));
v.bindmodel (gv);
gv->setsize (1.33, 1); // etc; other setup calls are hidden in this example
gv->finalize();
auto gv_pointer = v.addVisualModel (gv);
When we call addVisualModel, ownership of the GraphVisual object passes into the morph::Visual. We can’t subsequently access the now-defunct std::unique_ptr<> gv. We therefore hold the return value of addVisualModel which is a non-owning pointer to the GraphVisual we just added - it has type GraphVisual<float>*.
In the example, we can then see the use of gv_pointer in a while loop:
while (v.readyToFinish == false) {
    v.waitevents (0.018);
    // Slowly update the content of the graph
    if (rcount++ % 20 == 0 && idx < absc.size()) {
        // Append to dataset 0
        gv_pointer->append (absc[idx], data[idx], 0);
        // Append to dataset 1
        gv_pointer->append (absc[idx], data2[idx], 1);
        ++idx;
    }
    v.render();
}
Visual has a flag called readyToFinish, which gets set to true when the user presses Ctrl-q. As long as this is false, the loop first calls Visual::waitevents() which waits for up to 0.018 seconds for a keyboard or mouse event. When this returns, there’s a test to see if the graph should be updated with GraphVisual::append, accessed via the pointer gv_pointer. Whether or not the graph was updated, Visual::render() is called to render the scene.
Use of waitevents prevents the frame rate becoming too high. If you need the maximum possible framerate, then you can instead call Visual::poll() in place of waitevents.
If you want to guarantee the 0.018 s pause, you can instead call v.wait (0.018).
Pausing within a simulation
You may have a program which computes a set of numbers which you wish to plot and observe in order to make a decision about whether to quit the program, or continue on to a second stage of computation. You can’t use keepOpen() for this, because you can only exit keepOpen by signaling that the program is ready to finish.
Instead, you can use Visual::pauseOpen(). This sets a ‘paused’ flag, and goes into a render loop. This loop is exited when the user signals readyToFinish or causes the protected function Visual::unpause() to be called (this is bound to the key Ctrl-v).
MySim sim;
// Simulation part one
for (int i = 0; i < 1000; ++i) {
    sim.step();
    v.waitevents (0.018);
    // Observe graph change during simulation
    gv_pointer->append (sim.x(), sim.y(), 0);
    v.render();
}

// After 1000 steps, pause to observe the graph until user continues
// with Ctrl-v or quits with Ctrl-q
v.pauseOpen();

// Simulation part two only executes if readyToFinish is false
for (int i = 0; i < 1000 && v.readyToFinish == false; ++i) {
    // ...
}

v.keepOpen(); // View final result until user quits
Saving an image to make a movie
There’s a saveImage() function that you can use to save a PNG image of the screen.
std::string fname("./movie_images/frame000.png");
v.saveImage (fname);
To make a movie, simply generate a suitable sequential filename within your loop and call saveImage.
If you press Ctrl-s in a morphologica program, saveImage is called to save a PNG into the current working directory.
Saving the scene in glTF format
morph::Visual contains code to save the 3D model in glTF format. gltf files can be opened in 3D modelling programs like Blender. Note that only the ‘structural’ parts of the model are incorporated into the glTF file; text is not currently saved. Essentially, triangles are saved; text is not.
std::string fname("./scene.gltf");
v.savegltf (fname);
Ctrl-m can be used to save a glTF file from any morphologica program.
Extending morph::Visual to add custom key actions
When building a morphologica program, it’s often useful to implement program-specific key actions. The correct way to do this is to extend morph::Visual, adding either a replacement for the Visual::key_callback function or a replacement for Visual::key_callback_extra.
If you replace Visual::key_callback with an overload, you can remove or remap the key actions that are part of a default morph::Visual instance. For example, if you want to bind Ctrl-s to a new function, you’ll want to replace key_callback, because in Visual::key_callback, Ctrl-s invokes Visual::saveImage().
If you want to keep the default morphologica key bindings (which are all Ctrl-combinations) and just add new ones, simply code a replacement key_callback_extra function.
You can see how this works in the myvisual.cpp example code.
Underlying classes
morph::Visual is implemented by an underlying base class structure. If you use morph::Visual to provide your scene, then you will be using this inheritance chain:
namespace morph {
//                          VisualGlfw ----v
//    VisualBase ---> VisualOwnableMX ---> VisualMX ---> Visual
}
The functionality for Visual is provided by VisualMX, which is a multi-context-save class whose GL functions are loaded with the GLAD 2 header system. You can use VisualMX in place of Visual if you want to be explicit about the fact that you are using multi-context-safe code.
If you need to work with libraries that expect GL functions to be aliased in the global namespace (and called glClear, glEnable, glEtc) then you can use the class VisualNoMX, which has exactly the same interface as morph::Visual.
Working with multiple windows
You can create more than one morph::Visual in your program. Each Visual will be related to a separate OpenGL context. morphologica will handle the switching of the context automatically (by calling Visual::setContext() as needed, for example if you call Visual::render()).
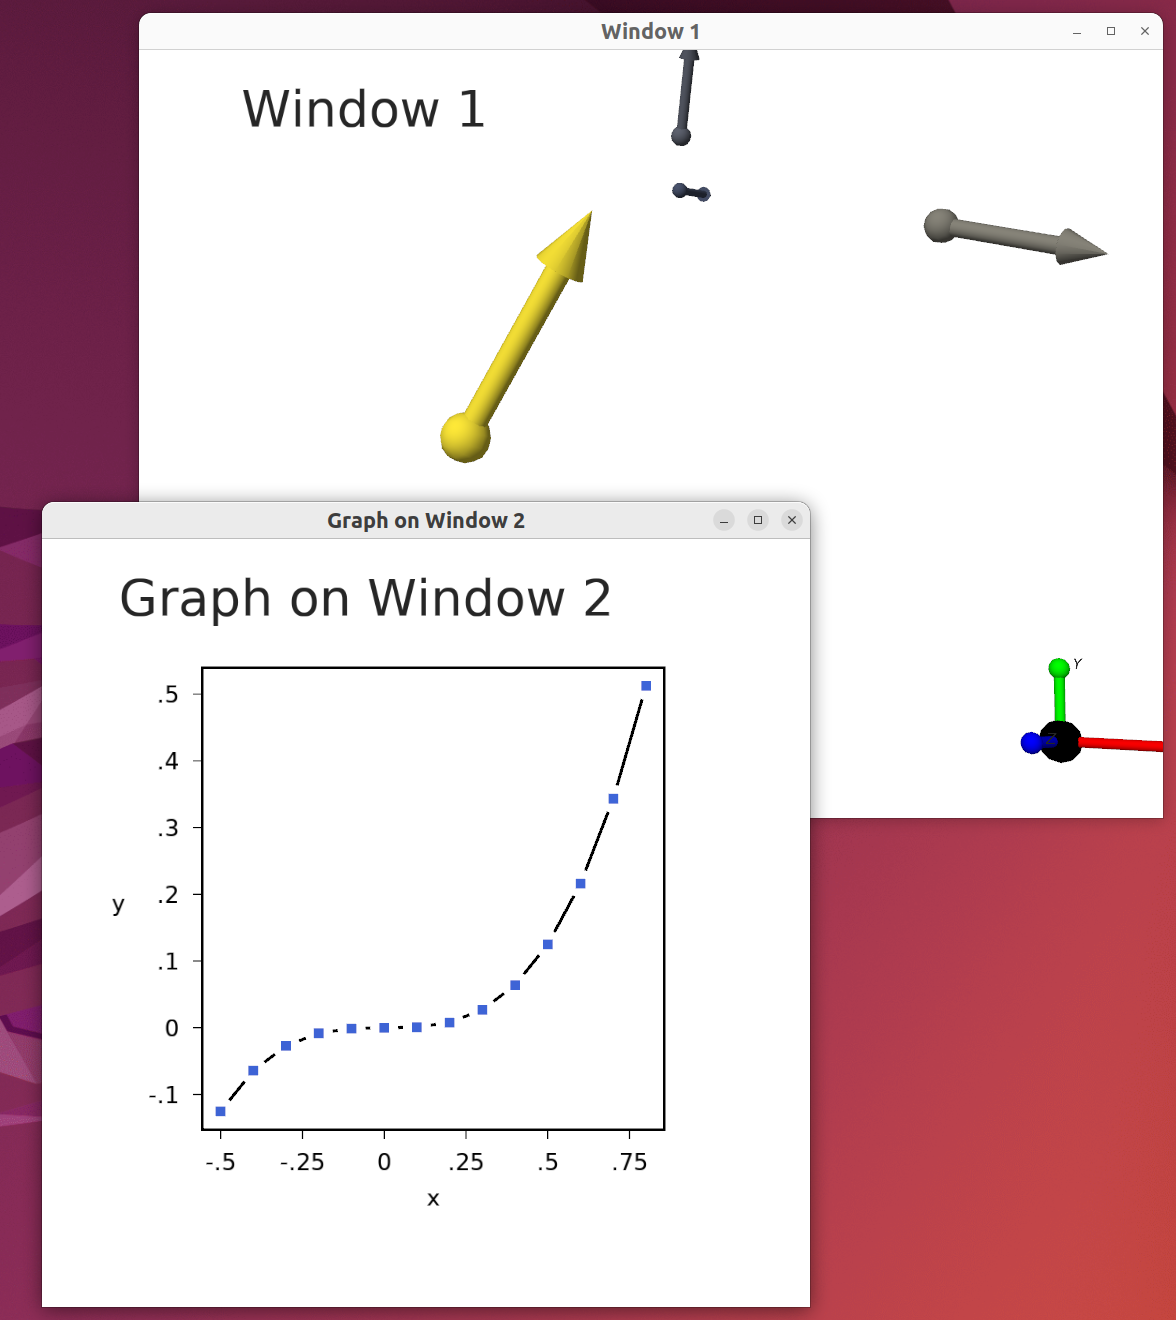
This is the twowindows.cpp example program, which displays two windows with two morph::Visual instances. The GraphVisual on window 2 shows what the preceding code example would generate. Window 1 shows another kind of morph::VisualModel (a QuiverVisual)
Because morphologica defaults to using multicontext-safe GL function calls, there is no problem working with multiple windows.
In practice, you can also create multiple windows with morph::VisualNoMX. Although in this case the GL function names are global, separate contexts are still maintained correctly.
Multi-threading
You can use morphologica in multi-threaded programs, but you do have to be very careful if you wish to split morph::Visual objects between threads.
The issue is that you are likely using a single GPU to render images and your OpenGL function calls each need to access the correct OpenGL ‘context’ (the context specifies the memory structures on CPU and GPU for a given window of your program - there’s generally one context per window).
If thread 1 has a function1() which sets context 1, starts to makes GL function calls on that context and then releases the context, and there’s another thread which calls function2() which sets context 2 and calls GL functions on it, you can see that function1() on thread 1 could be making glFunction calls into the wrong context if function2 ‘interrupted’ it before it was finished. You therefore have to write some kind of locking scheme to ensure that function1() and function2() do not overlap in execution and that really loses the benefit of multi-threading! In most cases, it is simplest and optimal to execute your graphics on a common thread.
Some of morph::Visual’s methods make calls to GLFW functions that (on some platforms) must run on ‘the main thread’. This has to do with how event queues (for mouse and keyboard input) are managed. This differs between Mac, Windows and Linux/X windows. On some platforms there is a common event processing queue, on others there is per-window event processing. Calling Visual::poll(), Visual::wait() and Visual::waitevents() only on the main thread will ensure cross-platform compatibility for your code. There’s a useful discussion on this subject here (see especially the comment from elmindreda).
There are no issues if you want to multi-thread the rest of your program - the parts that compute the values that will be visualized with morph::Visual.
Update March 2025
I think that it is intended to be possible to execute each OpenGL context on its own thread and that these can run in parallel by design. With the recent multicontext-safe approach, this should work without any issues.
OpenGL context, version and OWNED_MODE
morph::Visual and morph::VisualModel conspire to hide most of the OpenGL internals away from you, the client coder. However, there is some background knowledge that it’s useful to understand.
OpenGL context
OpenGL has a concept called the ‘context’. This refers to the memory structures created on the CPU and GPU for a given window of your program that make it possible to draw content. There’s generally one context per window (though it is also possible to create a context without a window or any graphics).
You program must always ‘obtain the correct context’ when drawing to a window. This is essential if your program has two or more windows, each with its own context.
You won’t generally have to worry about the OpenGL context when working with morphologica, because the functions in morph::Visual and morph::VisualModel automatically obtain the correct context whenever they require it.
Note that the morph::Visual constructors will set the OpenGL context, and then release it when they complete. VisualModel ‘Setup’ code such as VisualModel::finalize and VisualModel::addLabel will also obtain and then release the context. Other calls (such as the render calls) that require the context may acquire it when called and may not release it when they return. It is usually unnecessary to release the context for one window before setting it for another.
OpenGL Version
When you program with OpenGL, you have to choose which of the many versions of the library you want to use. morphologica uses ‘modern OpenGL’ which essentially means that we draw with GLSL shader programs. These are C-like programs which are executed by the graphics processing unit with many parallel threads (you don’t need to learn GLSL; morphologica provides default shader programs). Different versions of OpenGL provide different supported features in the GLSL and the C function calls that support it. ‘Modern OpenGL’ started with OpenGL version 3.3, but version 4.1 was chosen for morphologica’s default as it is well supported across the Linux, Mac and Windows platforms.
OpenGL 4.1 was originally the only option, but more recently Visual and friends were extended to support other OpenGL versions, including OpenGL 4.1 to 4.6 (which makes it possible to use GL compute shaders) and OpenGL 3.0 ES and up, which makes it possible to run morphologica programs on the Raspberry Pi.
The desired OpenGL version is passed to morph::Visual as a single template argument glver of type int.
template <int glver = morph::gl::version_4_1>
class Visual
{ ... }
The default value for glver is morph::gl::version_4_1 which requests the core version 4.1 of OpenGL. The integer values that specify each OpenGL version are defined in morph/gl/version.h. Both the ‘desktop’ OpenGL versions (from 4.1 up to 4.6) and the ‘ES’ versions (3.0 ES to 3.2 ES) are supported in both core and compatibility modes.
Note that the OpenGL version integer is also used as a template parameter in the morph::VisualModel objects that will populate your morph::Visual. You should ensure that the same value for the GL version is used across all classes.
OpenGL header inclusion
How you include OpenGL headers and link to OpenGL driver code can be complex, and can differ between Linux, Apple and Windows platforms.
In morphologica we use GLAD for the GL headers (the headers are morph/glad/gl.h for the single context schemme and morph/glad/gl_mx.h for the multicontext-safe scheme).
GLAD ensures that all the OpenGL functions are correctly loaded from the OpenGL driver.
It is also possible to include GL externally, but in this case you should use morph::VisualNoMX instead of morph::Visual.
Linking should be determined by the CMake system.
VisualOwnable
When Visual was first developed, it was designed to own its desktop window, which would always be provided by the GLFW library. The Visual class would manage GLFW setup and window creation/destruction. Window pointers (aliased as morph::win_t) were always of type GLFWwindow.
Later on, I wanted to add support for the Qt windowing system so that a morph::Visual could provide OpenGL graphics for a QtWidget. Qt manages OpenGL contexts and windows, so I had to create a new operating mode for morph::Visual in which it would use an externally managed context. To do this I defined OWNED_MODE enabled by #define lines.
In March 2025, I redesigned the code so that Visual-with-OWNED_MODE became a class called VisualOwnable.
However, unless you are integrating morphologica into Qt or WxWidgets, you won’t have to learn about VisualOwnable.